Author: Bian Xi

Disable automatic restarts after patching for Windows 11

Disable automatic restarts in Windows 11

To disable automatic restarts caused by Windows update.

Steps

  1. Start Command prompt as an admin. Run Local Group Policy Editor gpedit.msc.
  2. Administrative Templates → Windows Components → Windows Update → Manage end user experience → Configure Automatic Updates
  3. Administrative Templates → Windows Components → Windows Update → Legacy Policies → No auto-restart with logged on users for scheduled automatic updates installations

References

Disable automatic restarts Windows 11

Unlock Sichuan Telecom SIM card

Unlock Sichuan Telecom SIM card

If a Sichuan Telecom SIM card has not been used for more than 3 months, the card will be auto locked. In such case, unlocking via mobile App is required. In fact, the whole process is completed in Wechat app - Sichuan Telecom.

Steps

  • Use China Telecom Mobile (中国电信) APP, select 我, then select 线上复机. Then will lunch Wechat - Sichuan Telecom(微信-四川电信) online unlock (线上复机) function.

  • Then need to fill up the information, one item is the mobile number used to report unlock status.

  • After fill up info, China ID card is required to take photo on both side to upload, then need to take a photo of yourself.

  • Then need to do verification by recording a video of reading a declaration.

  • The last step is reading a number given on the screen.

References

中国电信APP-我-线上复机

Add vCPU in VMware Fusion for Windows

Add vCPU in VMware Fusion for Windows

As Windows Pro only supports 2 CPU sockets, after added 4 cores in VMware Fusion, the OS is still shown as 2 vCPU. To avoid this is, need to change cpuid.coresPerSocket to handle more than 2 cores.

Parameters

In .vmx file change following parameter, numvcpus is the total number of cores, which can be changed in GUI. cpuid.coresPerSocket should be changed to half of numvcpus.

numvcpus = "4"
cpuid.coresPerSocket = "2"

References

Odd behavior with Fusion 12.2 and Windows 11

How to disable Android File Transfer in Mac OSx

How to disable Android File Transfer in Mac OSx

Android File Transfer Agent conflicts with Garmin Music, so need to disable it in order to work.

Steps

Open the “Activity Monitor” and kill the “Android File Transfer Agent” process. Open “System Preferences” > “Accounts”. Go to the “Login Items” tab of your user. Remove the “Android File Transfer Agent”.

References

Avoid Android File Transfer starting automatically in Mac OS X after Android device plugin to USB port

Refill Canon 054 Cartridge

Refill Canon 054 Cartridge

Note: I haven't tried the process.

My print MF634Cx got error E015-0000, Canon support said it is not repairable. But I just got 4 new cartridges, want to reuse the ink. I bought a new MF645Cx, so want to try refilling the cartridges later. There are some refill videos on Internet.

Refill

To refill the cartridge, one method is to dig a hole, the second method is to open the cartridge.

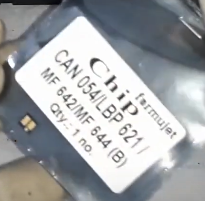
Chip

Although some people said the number of page used indication will give error, refilled cartridge is still able to be used. Alternatively can buy CRG-054 Chip to replace it.

Product

For Canon LBP 621 622 623 MF641 MF642 MF643 MF644 MF645 Printer Toner Chip,For Canon CRG 054 CRG054 CRG-054 Toner Cartridge Chip

CRG-054 H Chip for Canon MF641cw MF642cdw MF644cdw LBP622cdw LBP621Cw LBP623Cw

Subcategories:

  • K CRG-054K 1.5K WW
  • C CRG-054C 1.2K WW
  • M CRG-054M 1.2K WW
  • Y CRG-054Y 1.2K WW
  • K CRG-054HK 3.1K WW
  • C CRG-054HC 2.3K WW
  • M CRG-054HM 2.3K WW
  • Y CRG-054HY 2.3K WW

Chip:

Chip location:

References

Refill 054

how to refill canon 054 and 054H toner cartridge 2023.Refill canon printer 046, 046H Toner cartridge
Cartridge Refilling 054 canon 621cw color laser printer toner cartridge
Refilling the Canon 054 \ Canon 046 cartridge | how and how to refill the Canon cartridge
Refill toner cartridge Compatible for Canon CRG-045 CRG-046 CRG-054 054H CRG-055 Color cartridge.

Dig a hole

How to refill CRG 045 045H CRG 046 046H

Error

Code E015-0000

Building dnsmasq docker-compose file with DHCP enabled

Building dnsmasq docker-compose file with DHCP enabled

Creating Dockerfile

Create Dockerfile as below, the VOLUME /data is pointing to configuration folder

FROM ubuntu:latest

VOLUME /data

RUN apt update
RUN apt install dnsmasq -y
RUN apt install iproute2 -y

CMD dnsmasq -q -d --conf-file=/data/dnsmasq.conf --dhcp-broadcast

Creating docker-compose.yml file

Must add cap_add parameter.

version: '2'

services:
  dnsmasq:
    container_name: dnsmasq
    image: dnsmasq
    build:
      context: .
      dockerfile: Dockerfile.dnsmasq
    restart: unless-stopped
    volumes:
      - /app/dnsmasq/data:/data
    networks:
      - my_macvlan_250
    cap_add:
      - NET_ADMIN

networks:
  my_macvlan_250:
    external: true

This is the same as below command

docker run --cap-add=NET_ADMIN --name dnsmasq -d -it --restart unless-stopped -v /app/dnsmasq/data:/data --network my_macvlan_250 dnsmasq

References