Blog

Blog

Memory test hung after upgrade to 64GB RAM (Follow-up)

Memory test hung after upgrade to 64GB RAM (Follow-up)

Note: This is follow up action of Memory test hung after upgrade to 64GB RAM

This machine was installed TrueNAS, but reboot quite often, about few times a week. After that, I changed it to Proxmox, then one of the active VM kept hanging.

I decided to re-look into the memory test issue.

32GB testing

If only install 32GB memory, the test was OK at beginning. But after full day of testing, start to have 1 failure in one pass, not many but not acceptable.

64GB testing

If install 48GB or 64GB memory, the test caused system hanging in black screen.

Reduce memory speed

After reduce the memory speed to 1066 for 64GB memory, looks OK in Pass 1, but Pass 2 got issue again.

Getting worse

After full day of testing, the test result was getting worse. Previously hung at 80%+, then hung at 40%+. Then looks like problem caused by other factors, such as temperature, etc.

Then I noticed that the power supply is very hot and no noise. Then I think the issue could be the system was not getting enough power.

Change power supply

After take out the power supply, found that power supply fan was not turning. Normally, this issue can not be detected, because the fan towards the bottom of casing.

I got one new power supply, after installed new power supply, the system become colder.

Memory test

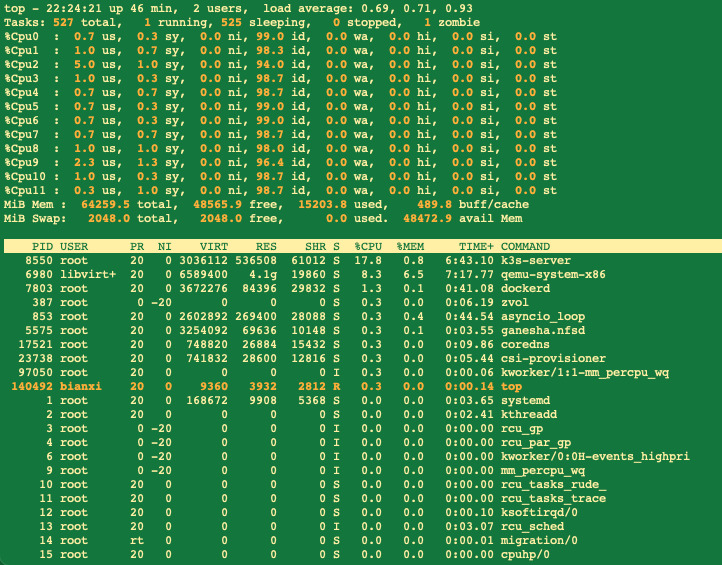
After changed the power supply, the memory passed when setting at speed of 1333, which is also the speed detected by motherboard. Even the motherboard auto overclocked CPU speed to 4000+ (CPU speed should be 3600), no error too.

Speed of the old set of RAMs

The new set of RAMs can pass testing at 1600 speed, but the old set got error less than 1 minute.

Although the spec of the old and new RAMs are all the same, brand, speed, etc, but the system detected the new RAMs are 1600, but old set are 1333, no matter in which memory slot. I'm not sure whether the lower speed is caused by aging or because cheated by seller.

Speed of testing among 1600, 1333, and 1066

During the testing, I noticed that the testing speeds are quite different among 1600, 1333 and 1066 if they are under same CPU speed.

References

MemTest86

Memory test hung after upgrade to 64GB RAM

Memory test hung after upgrade to 64GB RAM

Update: The problem was fixed as stated in Memory test hung after upgrade to 64GB RAM (Follow-up)

Took many hours to troubleshoot RAM test hanging issue.

Testing software

MemTest86

The test was hung at 86% during pass 1.

Memtest86+

The bootable USB created was not bootable.

Ubuntu Live CD

The testing was hung just started.

Posible issue

Hardware issue

Should not be RAM issue, tested them by separating them into two sets with 32GB each, using MemTest86, both sets can pass.

Maybe slot issue

The RAM must be in slots in correct order, otherwise, the RAM can not be detected. In fact, this mother board is quite sensitive to the RAM position.

E8036_P9X79_DELUXE

Maybe RAM hot

The RAMs could be too hot, the newly added RAMs make the gabs between RAMs are too small, the fans are also not strong enough, this could cause high temperature. I tried to adjust the fan speed by using the controls on casing, but not effective.

But RAM should be able to take high temperature, and the type of RAM I bought has cooling case.

Software issue

Maybe conflict with VGA

The max RAM size that MemTest86 can support, is 64GB, which means it could have bug too. On the other hand, the hunging shows nothing on the screen, black screen, but keyboard light was still responsive, and the VGA light on mother board was turned on. Maybe the software wrote the area that video card used caused such issue.

Conclusion

Although the testing was hung, I decided still use them.

In order to use them fully in TrueNAS, I adjusted the zfs_arc_max to 60GB, and run two VMs, one Windows at 4GB, one ubuntu at 6GB, till the memory free less than 4GB.

Result

The TrueNAS looks working fine, although restarted once, log didn't show the cause related to memory, and there was no memory issue in dmesg monitoring screen.

Proxmox VM boot from USB image

Proxmox VM boot from USB image

To boot from USB image in VM, such as USB image of memtest86-usb.img, import the disk as hard disk using following command.

qm importdisk 100 memtest86-usb.img upool1

Then

Add Unused disk into VM using Proxmox VM UI interface.

Then

Change boot order to new hard disk first in VM Options.

References

Attach a raw image as a USB disk to the VM

Reuse ASUS P9X79 DELUXE motherboard

Reuse ASUS P9X79 DELUXE motherboard

CPU

ASUS Info

P9X79 DELUXE

Following CPUs are supported

Core i7-3820 (3.6G,L3:10M,4C,HT,rev.M0)
Core i7-3820 (3.6G,L3:10M,4C,HT,rev.M1)
Core i7-3930K (3.2G,L3:12M,6C,HT,rev.C1)
Core i7-3930K (3.2G,L3:12M,6C,HT,rev.C2)
Core i7-3960X Extreme Edition(3.3G,L3:15M,6C,HT,rev.C1)
Core i7-3960X Extreme Edition(3.3G,L3:15M,6C,HT,rev.C2)
Core i7-3970X Extreme Edition(3.5G,L3:15M,6C,HT,150W,rev.C2)
Core i7-4820K (3.7GHz, L3:10M, 4C, HT, 130W, rev.S1)
Core i7-4930K (3.4GHz, L3:12M, 6C, HT, 130W, rev.S1)
Core i7-4960X (3.6G, L3:15M, 6C, HT, 130W, rev.S1)

Following CPUs are partially supported as description below

Intel Xeon Processor Family is designed for servers. Some features may not support when installed on X79 series chipsets. For more details, refer to ASUS support site at http://support.asus.com.

Intel Xeon E5-1620 v2 (3.7G,130W,L3:10M,4C,HT)
Intel Xeon E5-1650 v2 (3.5G,130W,L3:12M,6C,HT)
Intel Xeon E5-1660 v2 (3.7G,130W,L3:15M,6C,HT)
Intel Xeon E5-2603 v2 (1.8G,80W,L3:10M,4C,HT)
Intel Xeon E5-2609 v2 (2.5G,80W,L3:10M,4C,HT)
Intel Xeon E5-2620 v2 (2.1G,80W,L3:15M,6C,HT)
Intel Xeon E5-2630 v2 (2.6G,80W,L3:15M,6C,HT)
Intel Xeon E5-2630L v2 (2.4G,60W,L3:15M,6C,HT)
Intel Xeon E5-2637 v2 (3.5G,130W,L3:15M,4C,HT)
Intel Xeon E5-2640 v2 (2.0G,95W,L3:20M,8C,HT)
Intel Xeon E5-2643 v2 (3.5G,130W,L3:25M,6C,HT)
Intel Xeon E5-2650 v2 (2.6G,95W,L3:20M,8C,HT)
Intel Xeon E5-2650L v2 (1.7G,70W,L3:25M,10C,HT)
Intel Xeon E5-2660 v2 (2.2G,95W,L3:25M,10C,HT)
Intel Xeon E5-2667 v2 (3.3G,130W,L3:25M,8C,HT)
Intel Xeon E5-2670 v2 (2.5G,115W,L3:25M,10C,HT)
Intel Xeon E5-2680 v2 (2.8G,115W,L3:25M,10C,HT)
Intel Xeon E5-2687W v2 (3.4G,150W,L3:20M,8C,HT)
Intel Xeon E5-2690 v2 (3.0G,130W,L3:25M,10C,HT)
Intel Xeon E5-2695 v2 (2.4G,115W,L3:30M,12C,HT)
Intel Xeon E5-2697 v2 (2.7G,130W,L3:30M,12C,HT)

Intel Info

Compatibility for FCLGA2011, FCLGA2011-v3, and FCLGA2066 Sockets (Intel® Core™ X-series Processors)

FCLGA2011 socket compatibility

These processors are compatible with the FCLGA2011 socket. They are backward and forward compatible with the motherboard supporting FCLGA2011 socket. We recommend you always download the latest BIOS from the motherboard vendor when installing a new processor. For any issues, please check with your board manufacturer to see if your board is compatible with the processor you intend to use.

Intel® Core™ i7-4960X Processor Extreme Edition
Intel® Core™ i7-4930K / i7-4820K Processors
Intel® Core™ i7-3960X / i7-3970X Processor Extreme Edition
Intel® Core™ i7-3930K / i7-3820 Processors

Memory

CORSAIR Vengeance 32GB (4 x 8GB) 240-Pin DDR3 SDRAM DDR3 1600 (PC3 12800) Desktop Memory Model CMZ32GX3M4X1600C10

Final result

CPU Info
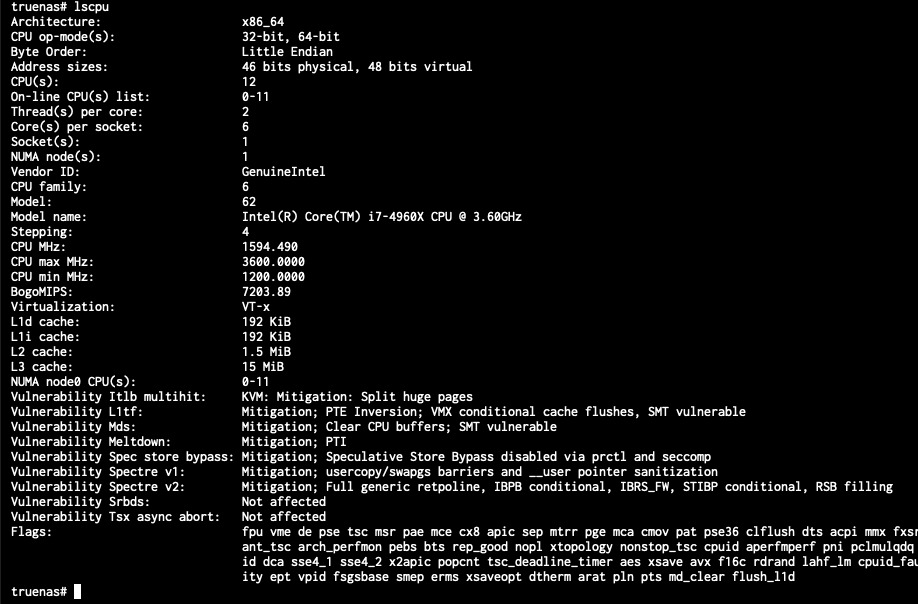
lscpu output

Memory

Memory and Performance

References

P9X79 DELUXE

GPU via M.2

GPU via M.2

Product

ATD-Link R43SG

Supports

Morefine S500+

Where to buy

https://www.aliexpress.com/item/1005003279448856.html?spm=a2g0o.productlist.0.0.7cffa20dWbpXKF&algo_pvid=3274993e-85b9-4c9a-9b2f-40609e37fa3d&algo_exp_id=3274993e-85b9-4c9a-9b2f-40609e37fa3d-3&pdp_ext_f=%7B%22sku_id%22%3A%2212000024996792414%22%7D

Review

Morefine S500+ Using RTX 3080 TI

M.2 PCIe x4 to External eGPU - Faster than TB3 eGPU's

ADT-link R43SG M.2 PCIe 3.0 x4 / NVMe to external GPU review. Cards tested GTX 1060 6GB & GTX 1080 Ti. Where to buy: http://s.click.aliexpress.com/e/INILpRw

8750H mini PC with 2 x M.2 NMVe slots: http://s.click.aliexpress.com/e/bpWvyIlE

Bitwarden Docker Installation

Bitwarden Docker Installation

Update: Bitwarden could not detect new and update password in browsers in most of cases. No matter how easy it can be used, without this auto detection feature, it is useless.

Bitwarden is an opensource password manager, can be self-hosted, and can be installed as docker container. It supports many browsers and OSes.

Steps

Create docker-compose.yaml

Create docker-compose.yaml, and make sure

  • SIGNUPS_ALLOWED is 'true'
# docker-compose.yml
version: '3'

services:
  bitwarden:
    image: bitwardenrs/server
    restart: always
    ports:
      - 8000:80
    volumes:
      - ./bw-data:/data
    environment:
      WEBSOCKET_ENABLED: 'true' # Required to use websockets
      SIGNUPS_ALLOWED: 'true'   # set to false to disable signups

Create

Run following command, in the directory contains docker-compose.yaml

docker-compose up -d

Configure HTTPS in NGINX

Without HTTPS, bitwarden doesn't allow new user registration.

Add following statements in server location definition.

server {
    server_name  nginx_host;
    listen 443 ssl;

    ...

    location /bw {
        rewrite /bw(.*) /$1 break;
        proxy_pass  'http://192.168.1.222:8000';
        proxy_redirect     off;
        proxy_set_header   Host $host;
    }
    ...
}

Then the URL of bitwarden will be https://nginx_host/bw/

Register

Access https://nginx_host/bw/, and register email and password.

Disable new user creation

  • Destory old bitwarden instance
docker-compose down
  • Update docker-compose.yaml file
SIGNUPS_ALLOWED: 'false';
  • Recreate instance
docker-compose up -d

Trun on 2FA

In website, go to Settings => Two-step Login ...

Install clients

Go to bitwarden website to install.

References

Run Bitwarden Password Manager in Docker Container
Install and Deploy - Linux
The Best Password Managers to Secure Your Digital Life
Host your own FREE Password Manager with your Synology NAS
Install and Sync All of Your Devices
Connect Clients to your Instance
Request Hosting Installation Id & Key

Hashicorp Vault docker installation and client testing

Hashicorp Vault docker installation and client testing

Vault Server Installation

Create one folder with 3 subfolders

mkdir -p vault/{config,file,logs}

Create vault configuration file

Create vault/config/vault.json

{
  "backend": {
    "file": {
      "path": "/vault/file"
    }
  },
  "listener": {
    "tcp":{
      "address": "0.0.0.0:8200",
      "tls_disable": 1
    }
  },
  "ui": true
}

Create docker-compose.yml

Create file vault/docker-compose.yml

version: '3.7'
services:
  vault:
    image: vault:latest
    container_name: vault
    ports:
      - "8200:8200"
    restart: unless-stopped
    volumes:
      -  ./logs:/vault/logs
      -  ./file:/vault/file
      -  ./config:/vault/config
    cap_add:
      - IPC_LOCK
    entrypoint: vault server -config=/vault/config/vault.json

Create container

Run docker-compose command in vault folder

cd vault
docker-compose up -d

Access WebUI

Access http://localhost:8200/ from browser

  • Select 5 as Key shares, and 3 as Key threshold, and Initialize
  • Download keys into a Json file
  • Use 3 keys to unseal vault
  • Use root token to login

Client installation

Ubuntu x86

  • Add the HashiCorp GPG key
# curl -fsSL https://apt.releases.hashicorp.com/gpg | apt-key add -
  • Add the official HashiCorp Linux repository
# apt-add-repository "deb [arch=amd64] https://apt.releases.hashicorp.com $(lsb_release -cs) main"
  • Install vault
# apt-get install vault
  • Verify
# vault

Connect to vault

  • Set environment
$ export VAULT_ADDR='http://127.0.0.1:8200'
$ export VAULT_TOKEN="<token>"
  • Check status
$ vault status
...
Sealed          false
...

Secrets operations

Subcommand kv v1 kv v2 Description
delete x x Delete versions of secrets stored in K/V
destroy x Permanently remove one or more versions of secrets
enable-versioning x Turns on versioning for an existing K/V v1 store
get x x Retrieve data
list x x List data or secrets
metadata x Interact with Vault\'s Key-Value storage
patch x Update secrets without overwriting existing secrets
put x x Sets or update secrets (this replaces existing secrets)
rollback x Rolls back to a previous version of secrets
undelete x Restore the deleted version of secrets

Example:

vault-getting-started:~# vault login root
Success! You are now authenticated. The token information displayed below
is already stored in the token helper. You do NOT need to run "vault login"
again. Future Vault requests will automatically use this token.

Key                  Value
---                  -----
token                root
token_accessor       rSn3h08ikdez4zch5ghr4wYY
token_duration       ∞
token_renewable      false
token_policies       ["root"]
identity_policies    []
policies             ["root"]
vault-getting-started:~# vault kv put secret/hello foo=world
Key              Value
---              -----
created_time     2021-11-25T06:15:45.332182013Z
deletion_time    n/a
destroyed        false
version          1
vault-getting-started:~# vault kv put secret/hello foo=world excited=yes
Key              Value
---              -----
created_time     2021-11-25T06:15:48.808651794Z
deletion_time    n/a
destroyed        false
version          2
vault-getting-started:~# vault kv get secret/hello
====== Metadata ======
Key              Value
---              -----
created_time     2021-11-25T06:15:48.808651794Z
deletion_time    n/a
destroyed        false
version          2

===== Data =====
Key        Value
---        -----
excited    yes
foo        world
vault-getting-started:~# vault kv get -field=excited secret/hello
yes
vault-getting-started:~# vault kv get -format=json secret/hello | jq -r .data.data.excited
yes
vault-getting-started:~# vault kv delete secret/hello
Success! Data deleted (if it existed) at: secret/hello
vault-getting-started:~#

Secret Engine

The driver to save secret in different way, type of secret.

List

Every path has it's own secret type

$ vault secrets list

Path          Type         Accessor              Description
----          ----         --------              -----------
cubbyhole/    cubbyhole    cubbyhole_78189996    per-token private secret storage
identity/     identity     identity_ac07951e     identity store
kv/           kv           kv_15087625           n/a
secret/       kv           kv_4b990c45           key/value secret storage
sys/          system       system_adff0898       system endpoints used for control, policy and debugging

Enable

Set one path to specific secret type

$ vault secrets enable -path=kv kv

Success! Enabled the kv secrets engine at: kv/

or

$ vault secrets enable kv

Create secret

$ vault kv put kv/hello target=world
Success! Data written to: kv/hello

Get secret

$ vault kv get kv/hello

===== Data =====
Key       Value
---       -----
target    world

Delete secret

$ vault kv delete kv/hello
Success! Data deleted (if it existed) at: kv/hello

List

$ vault kv list kv/

Keys
----
hello

Disable

$ vault secrets disable kv/

Success! Disabled the secrets engine (if it existed) at: kv/

Dynamic Secrets

When using secret engine such as aws engine.

$ vault secrets enable -path=aws aws

Success! Enabled the aws secrets engine at: aws/

More Info: Dynamic Secrets

Authentication

Token

  • Create token
$ vault token create
Key                  Value
---                  -----
token                s.iyNUhq8Ov4hIAx6snw5mB2nL
token_accessor       maMfHsZfwLB6fi18Zenj3qh6
token_duration       ∞
token_renewable      false
token_policies       ["root"]
identity_policies    []
policies             ["root"]
  • Login
$ vault login s.iyNUhq8Ov4hIAx6snw5mB2nL

Success! You are now authenticated. The token information displayed below
is already stored in the token helper. You do NOT need to run "vault login"
again. Future Vault requests will automatically use this token.

Key                  Value
---                  -----
token                s.iyNUhq8Ov4hIAx6snw5mB2nL
token_accessor       maMfHsZfwLB6fi18Zenj3qh6
token_duration       ∞
token_renewable      false
token_policies       ["root"]
identity_policies    []
policies             ["root"]
  • Revoke
$ vault token revoke s.iyNUhq8Ov4hIAx6snw5mB2nL

Success! Revoked token (if it existed)

GitHub

  • Enable
$ vault auth enable github

Success! Enabled github auth method at: github/
  • Set organization
$ vault write auth/github/config organization=hashicorp

Success! Data written to: auth/github/config
  • Configure the GitHub engineering team authentication to be granted the default and applications policies
$ vault write auth/github/map/teams/engineering value=default,applications

Success! Data written to: auth/github/map/teams/engineering
  • List
$ vault auth list

Path       Type      Description
----       ----      -----------
github/    github    n/a
token/     token     token based credentials
  • Set login method
$ vault login -method=github

GitHub Personal Access Token (will be hidden):
Success! You are now authenticated. The token information displayed below
is already stored in the token helper. You do NOT need to run "vault login"
again. Future Vault requests will automatically use this token.

Key                    Value
---                    -----
token                  s.DNtKCjVQ1TxAzgMqtDuwjjC2
token_accessor         e7zLJuPg2tLpav66ZSu5AyDC
token_duration         768h
token_renewable        true
token_policies         [default applications]
token_meta_org         hashicorp
token_meta_username    my-user
  • Login
$ vault login root
  • Revoke all tokens generated the github auth method
$ vault token revoke -mode path auth/github
  • Disable the github auth method
$ vault auth disable github

Success! Disabled the auth method (if it existed) at: github/

Policy

  • Policy for token

The policy path secret/data/* is related to all secret path secret/*.
The policy path secret/data/foo is related to secret path secret/foo.

  • Policy for approle

The policy path secret/approle/* is related to role_id + secret_id authentication.

Policy for token

  • Create
$ vault policy write my-policy - << EOF
# Dev servers have version 2 of KV secrets engine mounted by default, so will
# need these paths to grant permissions:
path "secret/data/*" {
  capabilities = ["create", "update"]
}

path "secret/data/foo" {
  capabilities = ["read"]
}
EOF
  • List
$ vault policy list

default
my-policy
root
  • Show
$ vault policy read my-policy

# Dev servers have version 2 of KV secrets engine mounted by default, so will
# need these paths to grant permissions:
path "secret/data/*" {
  capabilities = ["create", "update"]
}

path "secret/data/foo" {
  capabilities = ["read"]
}
  • Create token
$ export VAULT_TOKEN="$(vault token create -field token -policy=my-policy)"
  • Check policy
$ vault token lookup | grep policies
policies            [default my-policy]
  • Write success
$ vault kv put secret/creds password="my-long-password"

Key              Value
---              -----
created_time     2018-05-22T18:05:42.537496856Z
deletion_time    n/a
destroyed        false
version          1
  • Write failed
$ vault kv put secret/foo robot=beepboop

Error writing data to secret/data/foo: Error making API request.

URL: PUT http://localhost:8200/v1/secret/data/foo
Code: 403. Errors:

* 1 error occurred:
  * permission denied

Policy for approle

  • Enable
$ vault auth enable approle
Success! Enabled approle auth method at: approle/
  • Create my-role link to my-policy
$ vault write auth/approle/role/my-role \
    secret_id_ttl=10m \
    token_num_uses=10 \
    token_ttl=20m \
    token_max_ttl=30m \
    secret_id_num_uses=40 \
    token_policies=my-policy
Success! Data written to: auth/approle/role/my-role
  • Create role_id
$ export ROLE_ID="$(vault read -field=role_id auth/approle/role/my-role/role-id)"
  • Create secret_id
$ export SECRET_ID="$(vault write -f -field=secret_id auth/approle/role/my-role/secret-id)"
  • Login
$ vault write auth/approle/login role_id="$ROLE_ID" secret_id="$SECRET_ID"
Key                     Value
---                     -----
token                   s.Sh9h1wZ9ycATeSaASoOQvovr
token_accessor          xCgUIu6WWLM9opkEkAiNLsRc
token_duration          20m
token_renewable         true
token_policies          ["default" "my-policy"]
identity_policies       []
policies                ["default" "my-policy"]
token_meta_role_name    my-role

References

vault-docker
Install Vault

Thinking about the future of Chef

Thinking about the future of Chef

DevOps tools

These few days, I was thinking about how to manage my servers. Thinking about any DevOps tools to be used.

Looking for Ansible, the center management tool, which is called Ansible Tower, offers free for handling up to 10 nodes...

Looking for Chef, free for 25 nodes? That was 2014. Then now, free for 5 nodes...

Looking for Puppet, I bad experience in the past due to it's OS support, and I'm a scripter, perfer Chef's imperative language, not Puppet's declarative language.

Serverless

Chef people mentioned the word Serverless couple of years back, read some on-line documents, didn't understand how Chef goes serverless...

Today, After read another document, understand the real serverless meaning. It means Stateless for all servers, such as Core OS, no Chef required. True?

Ruby

Is Ruby hard to learn? I really don't feel it, and I think it is easy comparing with other OO Languages. But some people from DevOps team told me Ansible is easy, Ruby is hard. Hmmm...

Ruby is dying, maybe, it is not an OS default language, will not be the choice for sysadm.

JavaScript and Python

Running some servers using NodeJS, it solved some issues, but not a well structured programming language. Easy to start, hard to master.

Python, learnt and coded AI program, felt messy. Maybe I'm wrong.

A nature language is easy to start but hard to master, will this be the future of programming language as well? Or, nothing to master, just tell enough...

References

Who killed the Chef? The case against Opscode Chef in 2020
Introduction to is Ansible free?
Chef Enterprise Now Free Up to 25 Nodes
Open Source Chef vs Hosted Chef vs. On Premises Chef
Chef vs. Puppet: Methodologies, Concepts, and Support