Learning - Kubernetes
Components
-
Pod
- Smallest unit of K8s
- Abstraction over container
- Usually 1 application per Pod
- Each Pod gets its own IP address
- New IP address on re-creation
-
Service
-
Ingress
-
Deployment
- blueprint for my-app pods
- create deployments
- abstraction of Pods
- for stateLess Apps
-
StatefulSet
- For share storage
- for stateFUL apps or databases
-
Volumes
-
Secrets
-
ConfigMap
-
Nodes
Nodes
Worker
- Container runtime
- Kubelet
- interacts with both the container and node
- starts the pod with a container inside
- Kube Proxy - forwards the requests
Master
Functions
- Schedule pod
- Monitor
- Re-schedule/re-start pod
- Join a new Node
Processes
-
Api Server
- cluster gateway
- acts as a gatekeeper for authentication
-
Scheduler
- Decides on which Node new Pod should be scheduled
-
Controller manager
- detects cluster state changes
-
etcd
- is the cluster brain, Key Value Store
Minikube
1 Node K8s cluster
Kubectl - CLI
Install on Mac
brew update
brew install hyperkit
brew install minikube
kubectl
Create cluster
minikube start --vm-driver=hyperkit
kubectl get nodes
minikube status
kubectl version
kubectl get services
kubectl get pod
Create deployment
kubectl create deployment NAME --image=image [--dry-run] [options]
kubectl create deployment nginx-depl --image=nginx
kubectl get deployment
kubectl get replicaset
kubectl get pod
Change deployment
For example, change version of image
kubectl edit deployment nginx-depl
Then change the version of image. To show pods actions, run following commands
kubectl get pod
kubectl get replicaset
Old one has been deleted, new one has been created.
Check logs
kubectl logs nginx-depl-66859c8f65-vfjjk
Create mongodb deployment
kubectl create deployment mongo-depl --image=mongo
kubectl get pod
kubectl logs mongo-depl-67f895857c-fkspm
kubectl describe pod mongo-depl-67f895857c-fkspm
Debug
Run shell in pod
kubectl exec -it mongo-depl-67f895857c-fkspm -- bin/bash
Delete deployment
kubectl delete deployment mongo-depl
kubectl get pod
kubectl get replicaset
Configuration file
Deployment
Create configuration file called nginx-deployment.yaml
apiVersion: apps/v1
kind: Deployment
metadata:
  name: nginx-deployment
  labels:
    app: nginx
spec:
  replicase: 1
  selector:
    matchLabels:
      app: nginx
  template:
    metadata:
      labels:
        app: nginx
    spec:
      containers:
      - name: nginx
        image: nginx:1.16
        ports:
        - containerPort: 8080
Note: The first spec is for deployment, the inner spec is for pod.
Apply configuration
kubectl apply -f nginx-deployment.yaml
kubectl get pod
kubectl get deployment
Change deployment can be done by editing deployment file and apply again.
For service
apiVersion: v1
kind: Service
metadata:
  name: nginx-service
spec:
  selector:
    app: nginx
  ports:
    - portocol: TCP
      port: 80
      targetPort: 8080
3 parts of configuration
- metadata
- specification
- selectors - matchLables: defined which labels to be matched
- status
- Kubernetes compares desired state and actual state, and find out the difference
- Stored in
etcd
Note: Can use YAML data validator to validate the YAML file.
Nested configuration
In previous example, the pod configuration is in deployment configuration under spec, and named as template
Labels
In deployment file
-
Pod label: template label
-
Selector matchLabels: tell the deployment to connect or match all the labels to create the connection
-
Deployment label: Used by service selector
In service file
- Selector: connect to labels in the deployment and the pod
Ports
In deployment file, define the ports of pods
In service file, connect to the ports of pods
For example: DB Service -> port: 80 -> nginx Service -> targetPort:8080 -> Pod
Create both deployment and services
kubectl apply -f nginx-deployment.yaml
kubectl apply -f nginx-service.yaml
kubectl get pod
kubectl get service
kubectl describe service nginx-service
The Endports are the ports that the service must forward to, which can be found using -o wide option
kubectl get pod -o wide
To get deployment status in ectd
kubectl get deployment nginx-deployment -o yaml
Delete deployment
kubectl delete -f nginx-service.yaml
MongoDB and Mongo Express Example
- MongoDB - Internal Service
- MongoExpress - External Service
Minicube
Check all components
kubectl get all
Secret configuration
apiVersion: v1
kind: Secret
metadata:
  name: mongodb-secret
type: Opaque
data:
  mongo-root-username: dXNlcm5hbWU=
  mongo-root-password: cGFzc3dvcmQ=
To generate the base64 string for username and password
echo -n 'username' | base64
kubectl apply -f mongodb-secret.yaml
kubectl get secret
mongodb deployment
apiVersion: apps/v1
kind: Deployment
metadata:
  name: mongodb-deployment
  labels:
    app: mongodb
spec:
  replicase: 1
  selector:
    matchLabels:
      app: mongodb
  template:
    metadata:
      labels:
        app: mongodb
    spec:
      containers:
      - name: mongodb
        image: mongo
        ports:
        - containerPort: 27017
        env:
        - name: MONGO_INITDB_ROOT_USERNAME
          valueFrom:
            secretKeyRef:
              name: mongodb-secret
              key: mongo-root-username
        - name: MONGO_INITDB_ROOT_PASSWORD
          valueFrom:
            secretKeyRef:
              name: mongodb-secret
              key: mongo-root-password
kubectl apply -f mongo.yaml
kubectl get all
kubectl get pod
kubectl get pod --watch
kubectl describe pod mongodb-deployment-78444d94d6-zsrcl
Internal service
*Note: If want to put multiple YAML files into one, put --- in front of new file
Create service YAML in mongodb.yaml file as they belong together
...

---
apiVersion: v1
kind: Service
metadata:
  name: mongodb-service
spec:
  selector:
    app: mongodb
  ports:
    - portocol: TCP
      port: 27017
      targetPort: 27017
kubectl apply -f mongo.yaml
kubectl get service
kubectl describe service mongodb-service
kubectl get pod -o wide
Display service, deployment, replicaset and pod
kubectl get all | grep mongodb
ConfigMap
Create a file called mongo-configmap.yaml
apiVersion: v1
kind: ConfigMap
metadata:
  name: mongodb-configmap
data:
  database_url: mongodb-service
Note: The database_url is the service name, which is only the value of it. How to use it is depending on the application.
Mongo Express
apiVersion: apps/v1
kind: Deployment
metadata:
  name: mongo-express
  labels:
    app: mongo-express
spec:
  replicas: 1
  selector:
    matchLabels:
      app: mongo-express
  template:
    metadata:
      labels:
        app: mongo-express
    spec:
      containers:
      - name: mongo-express
        image: mongo-express
        ports:
        - containerPort: 8081
        env:
        - name: ME_CONFIG_MONGODB_ADMINUSERNAME
          valueFrom:
            secretKeyRef:
              name: mongodb-secret
              key: mongo-root-username
        - name: ME_CONFIG_MONGODB_ADMINPASSWORD
          valueFrom:
            secretKeyRef:
              name: mongodb-secret
              key: mongo-root-password
        - name: ME_CONFIG_MONGODB_SERVER
          valueFrom:
            configMapKeyRef:
              name: mongodb-configmap
              key: database_url
kubectl apply -f mongo-configmap.yaml
kubectl apply -f mongo-express.yaml
kubectl get pod
kubectl get logs mongo-express-797845bd97-p9grr
External service
Append following configuration behind mongo-express.yaml file
...

---
apiVersion: v1
kind: Service
metadata:
  name: mongo-express-ervice
spec:
  selector:
    app: mongo-express
  type: LoadBalancer
  ports:
    - protocol: TCP
      port: 8081
      targetPort: 8081
      nodePort: 30000
Note: Set type as LoadBalancer to define external service, and set nodePort between 30000-32767
kubectl appy -f mongo-express.yaml
kubectl get service
Note: The external services are shown as LoadBalancer, internal services are defined as ClusterIP which is DEFAULT.
Assign Public IP address in minikube
minikube service mongo-express-service
Namespace
get
kubectl get namespace
4 default namespaces
kube-system
- Do NOT create or modify in kube-system
- System processes
- Ma
kube-public
- publicely accessiable data
- A configmap, which contains cluster information
kubectl cluster-info
kube-node-lease
- heartbeats of nodes
- each node has associated lease object in namespace
- determines the availability of a node
default
- resources you create are located here
create
kubectl create namespace my-namespace
kubectl get namespace
Usage
- Structure your components
- Avoid conflicts between teams
- Share services between different environments
- Access and Resource Limits on Namespaces Level
Project namespace (isolation)
Officially: Should not use for smaller projects
Staging and Development (shared)
Can deploy common resources into separate namespace, such as Nginx-Ingress Controller, or Elastic Stack.
Blue and Green Deployment (shared)
Different versions of deployments use common resources, such as database, Nginx-Ingress Controller or Elastic Stack.
Namespace reference
- Secret and ConfigMap cannot be shared.
- Service can be shared, so ConfigMap can map services in other namespaces.
- Some resources, such as volume and node, can not be defined in namespace.
apiVersion: v1
kind: ConfigMap
metadata:
  name: mysql-configmap
data:
  db_url: mysql-service.database
Here, database is the namespace.
Apply
kubectl apply -f mysql-configmap.yaml
kubectl get configmap
kubectl get configmap -n default
This configmap is created in default namespace.
kubectl apply -f mysql-configmap.yaml --namespace=my-namespace
kubectl get configmap -n my-namespace
This configmap is created in my-namespace namespace.
or
apiVersion: v1
kind: ConfigMap
metadata:
  name: mysql-configmap
  namespace: my-namespace
data:
  db_url: mysql-service.database
List cluster resource
Some resources can not be created a Namespace level, such as volume, node.
kubectl api-resources --namespaced=false
kubectl api-resources --namespaced=true
Change the active namespace with kubens
brew install kubectx
kubens
kubens my-namespace
This will change the default behavior of namespace from default namespace to my-namespace
Ingress
Normal practice is
browser -> entrypoint -> Ingress Controller -> Internal services
External Service
apiVersion: v1
kind: Service
metadata:
  name: myapp-external-service
spec:
  selector:
    app: myapp
  type: LoadBalancer
  ports:
  - protocol: TCP
    port: 8080
    targetPort: 8080
    nodeProt:35010
Ingress
apiVersion: networking.k8s.io/v1beta1
kind: Ingress
metadata:
  name: myapp-ingress
spec:
  rules:
  - host: myapp.com
    http:
      paths:
      - backend:
          serviceName: myapp-internal-service
          servicePort: 8080
rules is the routing ruleshost is the host specified in browserpaths is the path in URL after the hostserviceName is the backend service namehttp is the internal communication, not for the external service
Example of internal service:
apiVersion: v1
kind: Service
metadata:
  name: myapp-internal-service
spec:
  selector:
    app: myapp
  ports:
    - protocol: TCP
      port: 8080
      targetPort: 8080
For external service vs internal service
- No nodePort in internal service
- Instead of Loadbalancer, default type: ClusterIP
Host in Ingress
myapp.com should be a vaild domain address- map domain name to Node's IP address, which is the entrypoint
The entrypoint can be one of the node in k8s cluster or the ingress server outside the k8s cluster.
Ingress Controller
Can be Ingress Controller Pod, evaluates and processes Ingress rules
- evaluates all the rules
- manages redirections
- entrypoint to cluster
- many third-party implementations
- K8s Nginx Ingress Controller
Entrypoint
- Cloud Load Balancer
- External Proxy Server
- separate server
- public IP address and open ports
- entrypoint to cluster
Sample of Ingress Controller in Minikube
Install
Automatically starts the K8s Nginx implementation of Ingress Controller
minikube addons enable ingress
kubectl get pod -n kube-system
Following port will be running
nginx-ingress-controller-xxxx
Create ingress rules
kubectl get ns
For example, configure to access kubernetes-dashboard from external
dashboard-ingress.yaml
apiVersion: networking.k8s.io/v1beta1
kind: Ingress
metadata:
  name: dashboard-ingress
  namespace: kubernetes-dashboard
spec:
  rules:
  - host: dashboard.com
    http:
      paths:
      - backend:
          serviceName: kubernetes-dashboard
          servicePort: 80
This is to divert all requests to dashboard.com to backend service kubernetes-dashboard at port 80
Note: Updated version is as below
apiVersion: networking.k8s.io/v1
kind: Ingress
metadata:
  name: dashboard-ingress
  namespace: kubernetes-dashboard
spec:
  rules:
  - host: dashboard.com
    http:
      paths:
        - path: /
          pathType: Prefix
          backend:
            service:
              name: kubernetes-dashboard
              port:
                number: 443
kubectl apply -f dashboard-ingress.yaml
kubectl get ingress -n kubernetes-dashboard
kubectl get ingress -n kubernetes-dashboard --watch
Define dashboard.com in /etc/hosts
192.168.64.5 dashboard.com
Default backend
Default backend: Whenever the request come to cluster that is not mapped to any backend service, no rule to map to any backend service, then this default backend is to handle those request. This is the default response, such as file not found response, or redirect to some other service.
$ kubectl describe ingress dashboard-ingress -n kubernetes-dashboard
...
Default backend: default-http-backend:80 (<none>)
...
To configure default backend, just need to do is create an internal service with same name as default-http-backendand port 80for custom message response.
apiVersion: v1
kind: Service
metadata:
  name: default-http-backend
spec:
  selector:
    app: default-response-app
  ports:
    - protocol: TCP
      port: 80
      targetPort: 8080
Multiple paths for same host
apiVersion: networking.k8s.io/v1beta1
kind: Ingress
metadata:
  name: simple-fanout-example
  annotations:
    nginx.ingress.kubernetes.io/rewrite-target: /
spec:
  rules:
  - host: myapp.com
    http:
      paths:
      - path: /analytics
        backend:
          serviceName: analytics-service
          servicePort: 3000
      - path: /shopping
        backend:
          serviceName: shopping-service
          servicePort: 8080
Multiple sub-domains or domain for same host
apiVersion: networking.k8s.io/v1beta1
kind: Ingress
metadata:
  name: name-virtual-host-ingress
spec:
  rules:
  - host: analytics.myapp.com
    http:
      paths:
        backend:
          serviceName: analytics-service
          servicePort: 3000
  - host: shopping.myapp.com
    http:
      paths:
        backend:
          serviceName: shopping-service
          servicePort: 8080
Configuring TLS Certificate - https
apiVersion: networking.k8s.io/v1beta1
kind: Ingress
metadata:
  name: tls-example-ingress
spec:
  tls:
  - host: myapp.com
  secretName: myapp-secret-tls
rules:
  - host: myapp.com
    http:
      paths:
      - path: /
        backend:
          serviceName: myapp-internal-service
          servicePort: 8080
apiVersion: v1
kind: Secret
metadata:
  name: myapp-secret-tls
  namespace: default
data:
  tls.crt: base64 encoded cert
  tls.key: base64 encoded key
type: kubernetes.io/tls
Note:
- Data keys need to be "tls.crt" and "tls.key"
- Values are file contents, NOT file paths/locations
- Secret component must be in the same namespace as the Ingress component
Helm
Package Manager for Kubernetes: To package YAML files and distribute them in public and private repositories
For example: Elastic Stack for Logging
- Stateful Set
- ConfigMap
- K8s User with permissions
- Secret
- Services
Helm Charts
- Bundle of YAML Files: All above configuration YAML files are bundled into Helm Chart
- Create your own Helm Charts with Helm
- Push them to Helm Repository
- Download and use existing ones
Such as
- Database Apps
- MongoDB
- Elasticsearch
- MySQL
- Monitoring Apps
Search using following commands or Helm Hub
helm search <keyword>
Public / Private Registries
Templating Engine
- Define a common blueprint
- Dynamic values are replaced by placeholders
apiVersion: v1
kind: Pod
metadata:
  name: {{ .Values.name }}
spec:
  containers:
  - name: {{ .Values.container.name }}
    image: {{ .Values.container.image }}
    port: {{ .Values.container.port }}
The values are from values.yaml
name: my-app
container:
  name: my-app-container
  image: my-app-image
  port: 9001
Here, the .Value is an object, which is created based on the values defined.
Values defined either via yaml file or with --set flag.
Usage
- Practical for CI /CD: In your Build you can replace the values on the fly.
- Deply same application across different environments, such as development/staging/production environments.
Structure
mychart/
  Chart.yaml
  values.yaml
  charts/
  templates/
mychart/ folder is the name of chart as wellChart.yaml has the meta information about chart, such as name dependencies, versionvalues.yaml has vaules for the template filescharts/ is the chart dependenciestemplates/ folder is the actual template files
Commands
helm install <chartname>
Override the default value in values.yaml
The final values will be saved in .Values object
- Using command line
--values option
helm install --values=my-values.yaml <chartname>
For example, the my-values.yaml file can override vesrions value.
- Using command line
--set option
helm install --set version=2.2.0
Release management
Tiller Helm Version 2
With server called Tiller. The client run following install command, will send requests to Tiller, that actually runs in a Kubernetes cluster.
helm install <chartname>
Whenever create or change deployment, Tiller will store a copy of configuration for release management.
When run upgrade command below, the changes are applied to existing deployment instead of creating a new one.
helm upgrade <chartname>
Also can handle rollbacks
helm rollback <chartname>
In Helm 3, Tiller got removed.
Volumes
Storage requirements
- Storage that doesn't depend on the pod lifecycle.
- Storage must be available on all nodes.
- Storage needs to survive even if cluster crashes.
Persistent Volume
Sample of NFS pv
apiVersion: v1
kind: PersistentVolume
metadata:
  name: pv-name
spec:
  capacity:
    storage: 5Gi
  volumeMode: Filesystem
  accessModes:
    - ReadWriteOnce
  persistentVolumeReclaimPolicy: Recycle
  storageClassName: slow
  mountOptions:
    - hard
    - nfsvers=4.0
  nfs:
    path: /dir/path/on/nfs/server
    server: nfs-server-ip-address
Sample of Google Cloud
apiVersion: v1
kind: PersistenVolume
metadata:
  name: test-volume
  labels:
    failure-domain.beta.kubernetes.io/zone: us-central1-a__us-centrall-b
spec:
  capacity:
    storage: 400Gi
  accessModes:
  - ReadWriteOnce
  gcePersistentDisk:
    pdName: my-data-disk
    fsType: ext4
Note: The gcePersistentDisk is the Google Cloud parameters
Sample of local storage
apiVersion: v1
kind: PersistentVolume
metadata:
  name: example-pv
spec:
  capacity:
    storage: 100Gi
  volumeMode: Filesystem
  accessModes:
  - ReadWriteOnce
  persistentVolumeReclaimPolicy: Delete
  storageClassName: local-storage
  local:
    path: /mnt/disks/ssd1
  nodeAffinity:
    required:
      nodeSelectorTerms:
      - matchExpressions:
        - key: kubernetes.io/hostname
          operator: In
            values:
            - example-node
- PV outside of the namespaces
- Accessible to the whole cluster
Local vs. Remote Volume Types
Local volumes should not be used as PV
- Being tied to 1 specific node
- Surviving cluster crashes
K8s Administrator and K8s User
-
K8s Admin sets up and maintains the cluster, and make sure has enough resource.
-
K8s User deploys application in cluster
Persistent Volume Claim
- Application has to claim the Persistent Volume
Define a PVC
kind: PersistentVolumeClaim
apiVersion: v1
metadata:
  name: pvc-name
spec:
  storageClassName: manual
  volumeMode: Filesystem
  accessModes:
    - ReadWriteOnce
  resources:
    requests:
      storage: 10Gi
Use that PVC in Pods configuration
apiVersion: v1
kind: Pod
metadata:
  name: mypod
spec:
  containers:
     - name: myfrontend
       image: nginx
       volumeMounts:
       - mountPath: "/var/www/html"
         name: mypod
   volumes:
     - name: mypd
       persistentVoumeClaim:
         claimName: pvc-name
PVC must be in the same namespace.
The advantage of having separate PV and PVC is to abstract the usage of volume which doesn't need to know the actual storage location and it's type, easier for developers.
ConfigMap and Secret
- They are local volumes
- They are not created via PV and PVC
- They are managed by kubernetes itself
This can be done by
- Create ConfigMap and/or Secret component
- Mount that into your pod/container
Different volume type
Can configure different volumes with different types in pod
appVersion: v1
kind: Deployment
metadata:
  name: elastic
spec:
  selector:
    matchLabels:
      app: elastic
  template:
    metadata:
      labels:
        app: elastic
    spec:
      containers:
      - image: elastic:latest
        name: elastic-container
        ports:
        - containerPort: 9200
        volumeMounts:
        - name: es-persistent-storage
          mountPath: /var/lib/data
        - name: es-secret-dir
          mountPath: /var/lib/secret
        - name: es-config-dir
          mountPath: /var/lib/config
      volumes
      - name: es-persistent-storage
        persistentVolumeClaim:
          claimName: es-pv-claim
      - name: es-secret-dir
        secret:
          secretName: es-secret
      - name: es-config-dir
        configMap:
          name: es-config-map
Storage Class
Storage Class provisions Persistent Volumes dynamically when PersistentVolumeClaim claims it.
apiVersion: storage.k8s.io/v1
kind: StorageClass
metadata:
  name: storage-class-name
provisioner: kubernetes.io/aws-ebs
parameters:
  type: io1
  iopsPerGB: "10"
  fsType: ext4
StorageBackend is defined in the SC component
- via "provisioner" attribute
- each storage backend has own provisioner
- internal provisioner - "kubernetes.io"
- external provisioner
- configure parameters for storage we want to request for PV
Another abstraction level
- abstracts underlying storage provider
- parameters for that storage
Storage class usage
In PVC config
apiVersion: v1
kind: PersistentVolumeClaim
metadata:
  name: mypvc
spec:
  accessModes:
  - ReadWriteOnce
  resources:
    requests:
      storage: 100Gi
  storageClassName: storage-class-name
StatefulSet
Stateful application: database, application that stores data, deployed using StatefulSet
Stateless application: deployed using Deployment, replicate Pods
Differences
Replicating stateful application is more difficult
- Replicate stateless application
- identical and interchangeable
- created in random order with random hashes
- one Service that
load balances to any Pod
- Replicate stateful application
- can't be created/delete at same time
- can't be randomly addressed
- replica Pods are not identical
- Pod Identity
Pod Identity
- sticky identity for each pod
- create from same specification, but not interchangeable
- persistent identifier across any re-scheduling, when old pod replace by new pod, identity remains
Scaling database applications
- Reading from all pods
- Writing from one pod only (Master)
- Continuously synchronizing of the data from Master to Workers
- Cluster database setup is required for synchronization
- The new worker always clones the data from PREVIOUS pod, not from a random pod
- Temporary storage (non persistent storage) theoretically used by stateful set is possible
- only replicate data without persistent storage
- data will be lost when all Pods die
- Persistent storage should be configured for stateful set
- Persistent Volume lifecycle isn't tied to other component's lifecycle
Pod state
- Pod state saves information about pod, such as whether it is master or not, etc.
- Pod state storage must be shared for all pods.
- StatefulSet has fixed ordered names,
$(statefulset name)-$(ordinal)
- Pods
mysql-0, mysql-1, mysql-2, here mysql-0 is master, others are workers
- Next Pod is only created if previous is up and running
- Delete StatefulSet or scale down to 1 replica, deletion in reverse order, starting from the last one
- DNS includes
- loadbalancer service
mysql-0, which is same as deployment
- individual service name,
${pod name}.${governing service domain}
mysql-0.svc2, mysql-1.svc2, mysql-2.svc2- predictable pod name
- fixed individual DNS name
- Restarts
- IP address changes
- name and endpoint stay same
Sticky identity
Replicating stateful apps
- User need to do
- Configuring the cloning and data synchronization
- Make remote storage available
- Managing and backup
Note: So stateful applications are not perfect for containerized environments
Kubernetes Services
Types
- ClusterIP Services
- Headless Services
- NodePort Services
- LoadBalancer Services
What is a Service
- Each Pod has its own IP address
- Pods are ephemeral - are destoryed frequently!
- Service:
- stable IP address
- loadbalancing
- loose coupling
- within & outside cluster
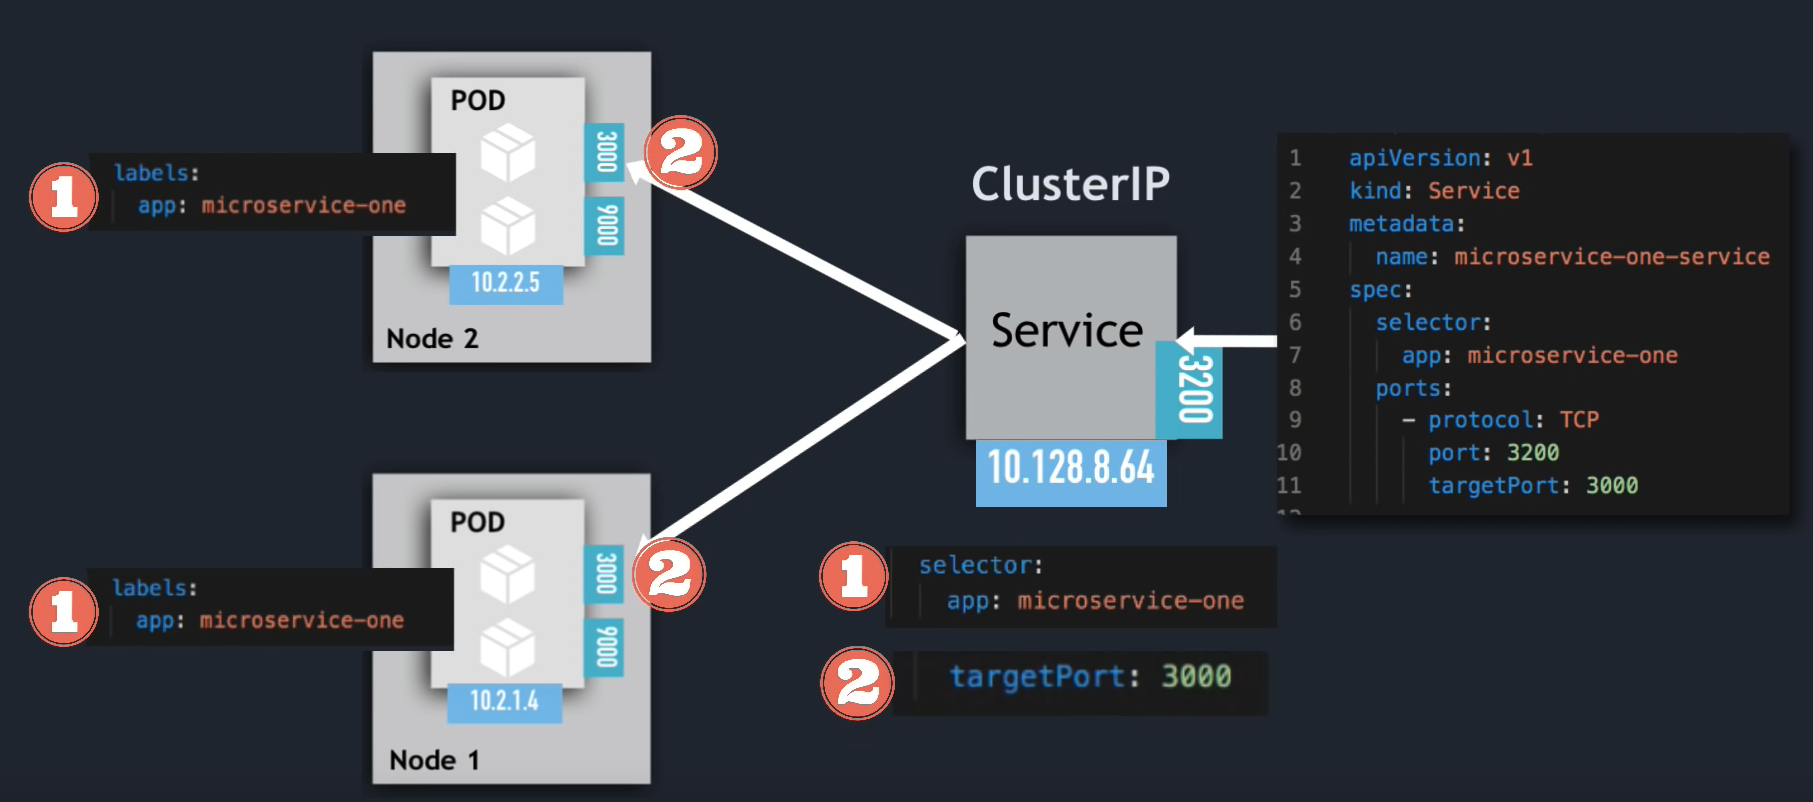
ClusterIP
apiVersion: v1
kind: Service
metadata:
  name: microservice-one-service
spec:
  selector:
    app: microservice-one
  ports:
    - protocol: TCP
      port: 3200
      targetPort: 3000
Example:
- microservice app deployed
- side-car container (collects microservice logs)
apiVersion: apps/v1
kind: Deployment
metadata:
  name: microservice-one
  ...
spec:
  replicas: 2
  ...
  template:
    metadata:
      labels:
        app: microservice-one
    spec:
      containers:
      - name: ms-one
        image: my-private-repo/ms-one
        ports:
        - containerPort: 3000
      - name: log-collector
        image: my-private-repo/log-col
        ports:
        - containerPort: 9000
- IP address from Node's range
kubectl get pod -o wide
apiVersion: networking.k8s.io/v1beta1
kind: Ingress
metadata:
  name: ms-one-ingress
  annotations:
    kubernetes.io/ingress.class: "nginx"
spec:
  rules:
    - host: microservice-one.com
      http:
        paths:
          - path:
            backend:
              serviceName: microservice-one-service
              servicePort: 3200
Service Communication: selector
Which Pods to forward the request to?
- Pods are identified via selectors
- key value pairs
- labels of pods
- random label names
Service
apiVersion: v1
kind: Service
metadata:
  name: microservice-one-service
spec:
  selector:
    app: microservice-one
Deployment
apiVersion: apps/v1
kind: Deployment
metadata:
  name: microservice-one
  ...
spec:
  replicas: 3
  ...
  template:
    metadata:
      labels:
        app: microservice-one
- Svc matches all 3 replica
- registers as Endpoints
- must match ALL the selectors
For example:
In Service yaml file,
selector:
  app: my-app
  type: microservice
In Pods
labels:
  app: my-app
  type: microservice
Then service matches all replicas of pods in deployments
targetPort
Which port to forwards to
The spec:ports:targetPort in service yaml file to be used
apiVersion: v1
kind: Service
metadata:
  name: microservice-one-service
spec:
  selector:
    app: microservice-one
  ports:
    - protocol: TCP
      port: 3200
      targetPort: 3000

Service Endpoints
- K8s creates Endpoint object
- same name as Service
- keeps track of, which Pods are the members/endpoints of the Service
$ kubectl get endpoints
NAME             ENDPOINTS                      AGE
kubenetes        172.104.231.137:6443           15m
mongodb-service  10.2.1.4:27017,10.2.1.5:27017  5m27s
port vs targetPort
- Service port is arbitrary
- targetPort must match the port, the container is listening at
Sample of mongodb service
apiVersion: v1
kind: Service
metadata:
  name: mongodb-service
spec:
  selector:
    app: mongodb
  ports:
    - name: mongodb
      protocol: TCP
      port: 27017
      targetPort: 27017
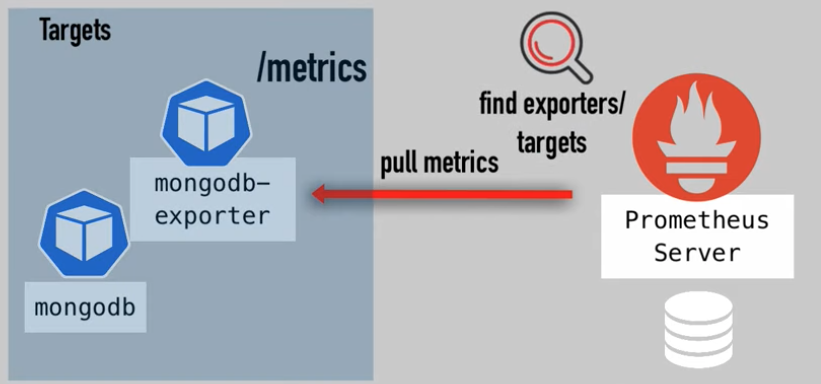
Multi-Port Services
apiVersion: v1
kind: Service
metadata:
  name: mongodb-service
spec:
  selector:
    app: mongodb
  ports:
    - name: mongodb
      protocol: TCP
      port: 27017
      targetPort: 27017
    - name: mongodb-exporter
      protocol: TCP
      port: 9216
      targetPort: 9216
The ports must be named.
Headless Services
Set spec:clusterIP to None
- Client wants to communicate with 1 specific Pod directly
- Pods want to talk directly with specific Pod
- So, not randomly selected
- Use Case: Stateful applications, like databases
- Pod replicas are not identical
- Only Master is allowed to write to DB
One solution
- Client needs to figure out IP addresses of each Pod
- Option 1 - API call to K8s API Server (no good)
- makes app to tied to K8s API
- inefficient
- Option 2 - DNS Lookup
- DNS Lookup for Service - returns single IP address (ClusterIP)
- Set ClusterIP to "None" - returns Pod IP address instead
For example,
apiVersion: v1
kind: Service
metadata:
  name: mongodb-service-headless
spec:
  clusterIP: None
  selector:
    app: mongodb
  ports:
    - name: mongodb
      protocol: TCP
      port: 27017
      targetPort: 27017
- No cluster IP address is assigned!
In stateful application, both ClusterIP and Headless services are used together
- ClusterIP service is used for reading
- Headless service is used for writing, data synchonization
$ kubectl get svc
NAME                      TYPE       CLUSTER-IP      EXTERNAL-IP  PORT(S)         AGE
kubernetes                ClusterIP  10.128.0.1      <none>       443/TCP         20m
mongodb-service           ClusterIP  10.128.204.105  <none>       27017/TCP       10m
mongodb-service-headless  ClusterIP  None            <none>       27017/TCP       2m8s
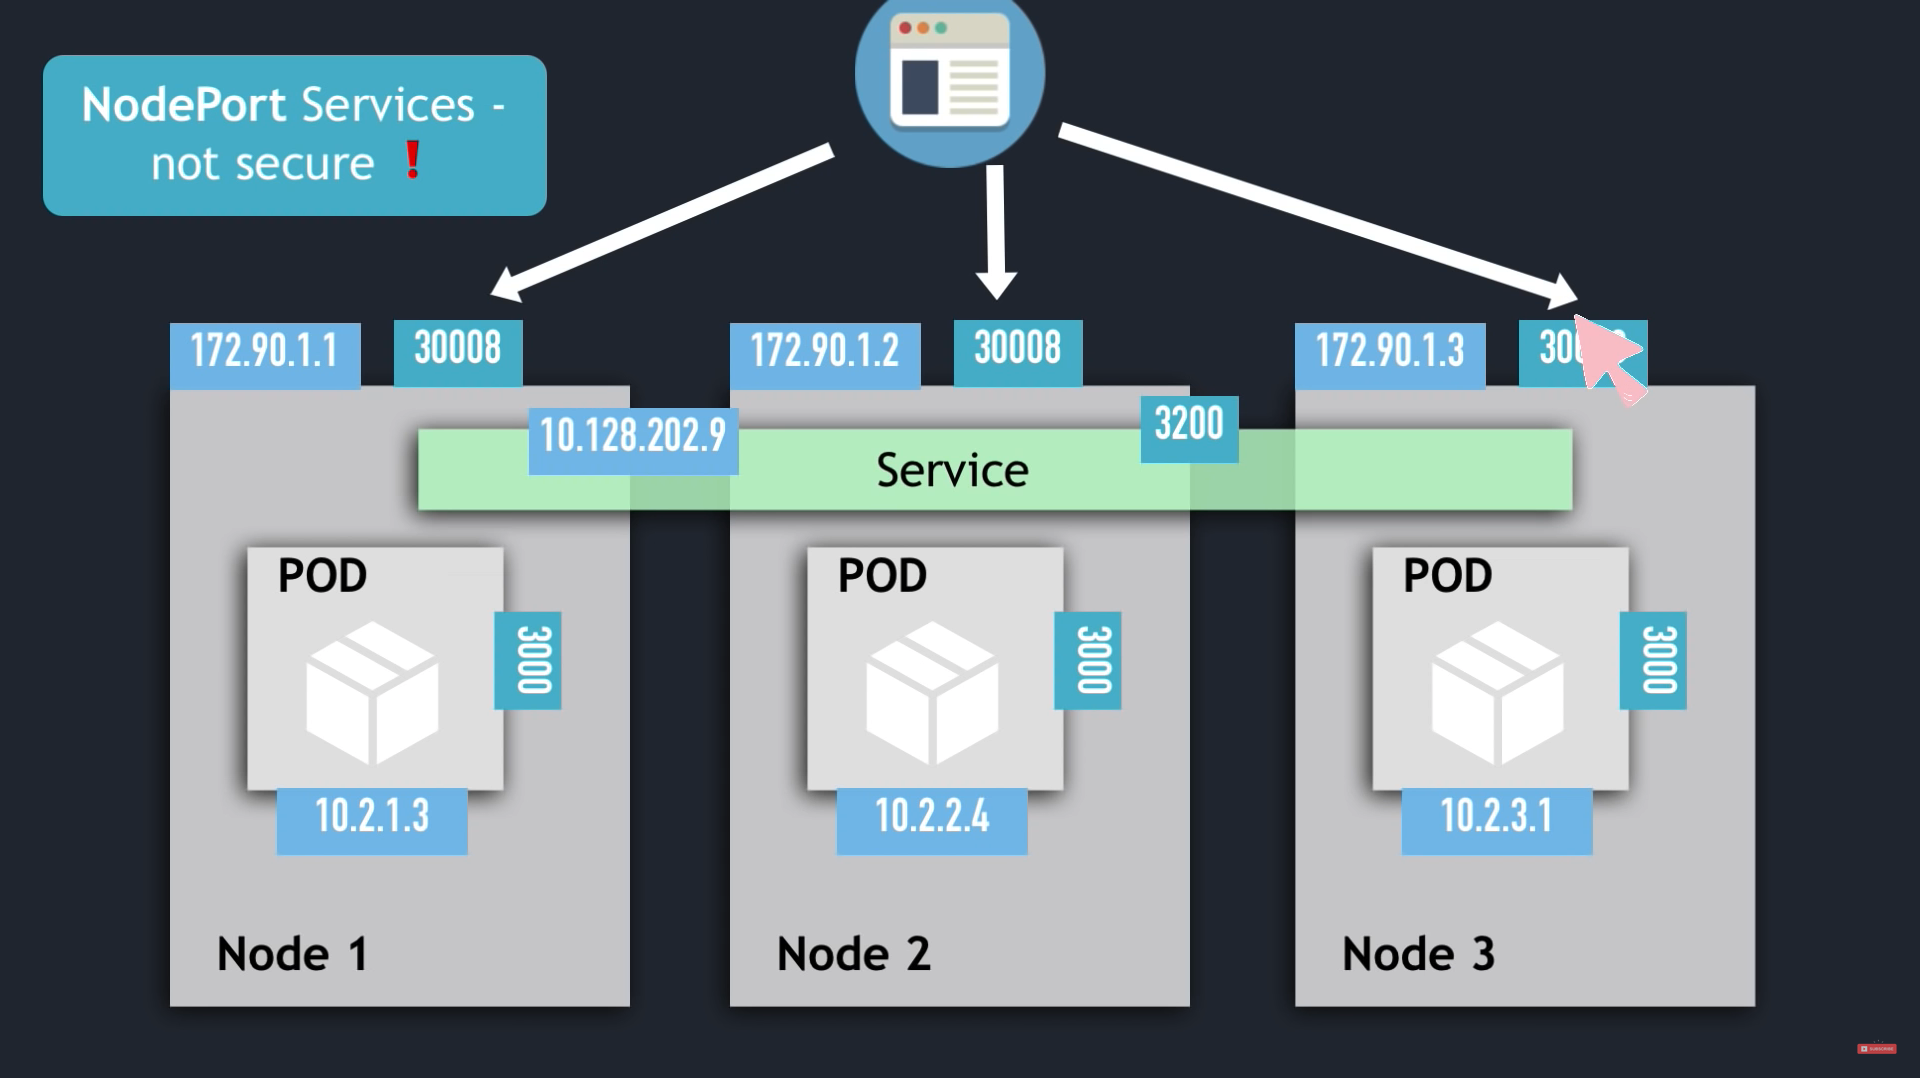
NodePort Services
For ClusterIP service, ClusterIP only accessible within cluster, the external traffic can only access via Ingress.
External => Ingress => ( ClusterIP Service => POD nodes ) == Worker Node
For NodePort service, external traffic has access to fixed port on each Worker Node.
External => ( NodePort => ClusterIP Service => POD nodes ) == Worker Node
apiVersion: v1
kind: Service
metadata:
  name: ms-service-nodeport
spec:
 type: NodePort
  selector:
    app: microservice-one
  ports:
    - protocol: TCP
      port: 3200
      targetPort: 3000
      nodePort: 30008
- The nodePort range: 30000 - 32767
- The NodePort service can be accessed via
ip-address of Worker Node and nodePort
- ClusterIP Service is automatically created.
For example,
$ kubectl get svc
NAME                      TYPE       CLUSTER-IP      EXTERNAL-IP  PORT(S)         AGE
kubernetes                ClusterIP  10.128.0.1      <none>       443/TCP         20m
mongodb-service           ClusterIP  10.128.204.105  <none>       27017/TCP       10m
mongodb-service-headless  ClusterIP  None            <none>       27017/TCP       2m8s
ms-service-nodeport       NodePort   10.128.202.9    <none>       3200:30008/TCP  8s
- The ClusterIP service is listening at
cluster-ip:3200
- The NodePort service is listening at
node-ip:30008

LoadBalancer Services
ClusterIP service is accessible externally through cloud providers LoadBalancer.
NodePort and ClusterIP Service are created automatically!
apiVersion: v1
kind: Service
metadata:
  name: ms-service-loadbalancer
spec:
 type: LoadBalancer
  selector:
    app: microservice-one
  ports:
    - protocol: TCP
      port: 3200
      targetPort: 3000
      nodePort: 30010
- LoadBalancer Service is an extension of NodePort Service
- NodePort Service is an extension of ClusterIP Service
$ kubectl get svc
NAME                      TYPE       CLUSTER-IP      EXTERNAL-IP    PORT(S)
kubernetes                ClusterIP  10.128.0.1      <none>         443/TCP
mongodb-service           ClusterIP  10.128.204.105  <none>         27017/TCP
mongodb-service-headless  ClusterIP  None            <none>         27017/TCP
ms-service-loadbalancer   ClusterIP  10.128.233.22   172.104.255.5  3200:30010/TCP
ms-service-nodeport       NodePort   10.128.202.9    <none>         3200:30008/TCP
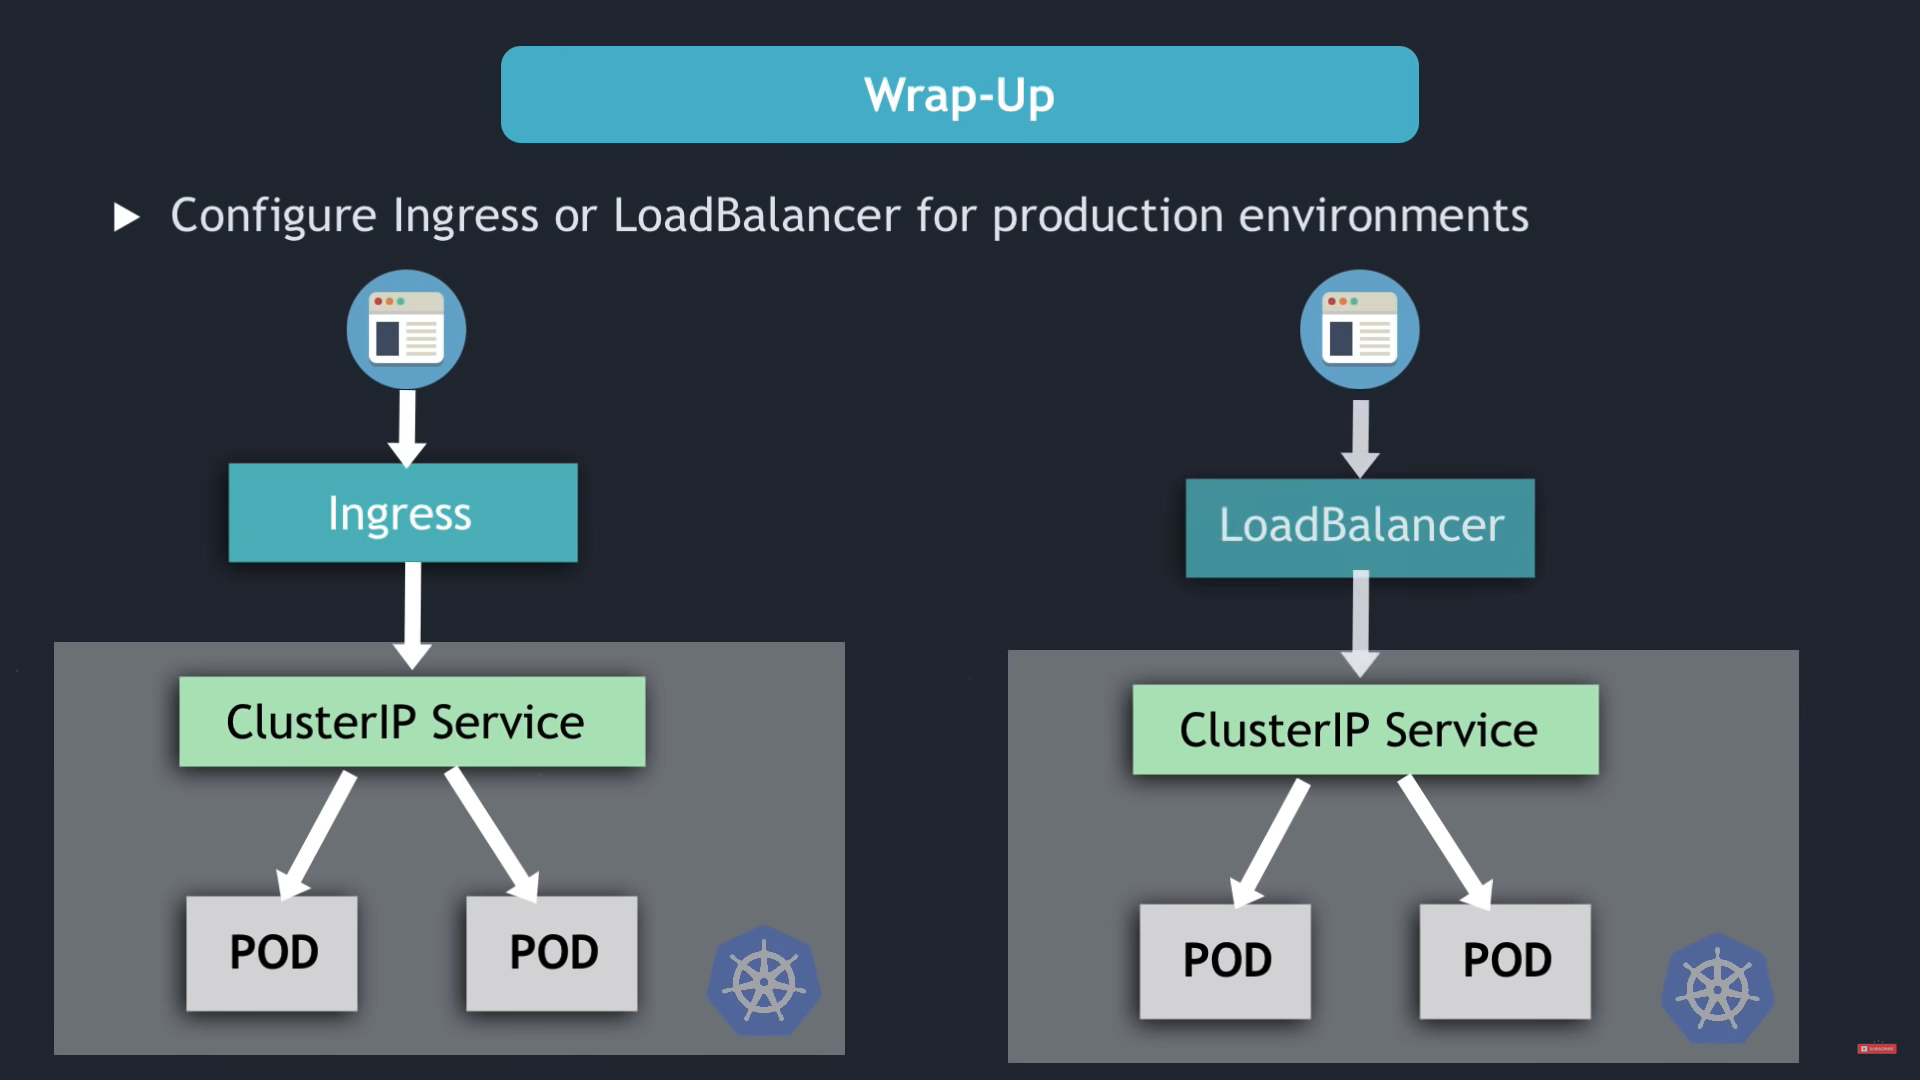
- NodePort Service NOT for external connection
- Configure Ingress or LoadBalancer for production environment

References
Kubernetes Tutorial for Beginners [FULL COURSE in 4 Hours]